

With the world dealing with the recent pandemic. The only way to keep my mental health in check is to get creative. I set myself tasks each week and I focused on these to block out the fears and worries of Covid 19.
For sometimes, I have been considering changing my flooring. I considered tiles or a white wash laminate to brighten up the space. The cost of this renovation was not something I was ready to make now. Particularly, with the current financial state of the world.
In my search for a cheaper alternative, I came across a post by @my_mindful_home about painting laminate flooring. This prompted and encouraged me to go ahead with this project.
I researched which floor paints to use….
I thought it was safest to go with a brand that was tried and tested. Lucky for me, my local home improvement store stocked the V33 renovation floor and stair paint. To further put my mind at ease, I consulted the paint expert at the home improvement store. She too had heard great reviews about this protect.
V33 offer this paint in 4 shades. Don’t ask me why but I went for the Satin white. I guess I was taking a big jump with this project so I thought I would go all the way.
Initially I had bought one 2 litre of paint but given that I had to give my floor three coats of paint to get my desired finished, I had to purchase an additional 0.75l to finish the job. BTW my living room is not that big either.
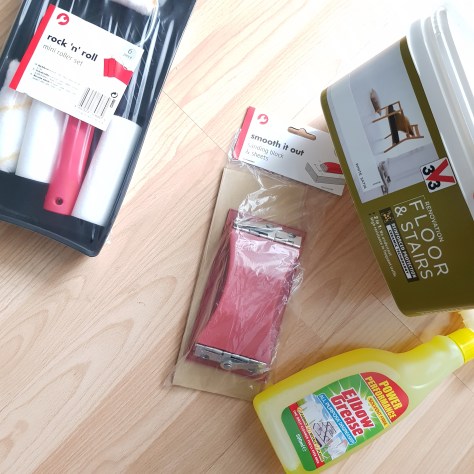
To complete this project I used
-Elbow grease degreaser.
-Sanding paper and a sanding block
-Paint brush
-Paint roller
-Hoover
-Cleaning clothes
To begin with, I mentally sectioned off the work. Given that I don’t have much space, I had to work in sections. This meant moving all the furniture to one side / corner of room at any one time.
I hoovered my floor well to get rid of any dust and dirt. I than cleaned the floor with the degreaser to get rid of any oil or residue.
Although the V33 instructions does not mention sanding the area, I took this additional step to ensure that the paint has a good surface to bond to. You may decide to skip this step if you wish.
I hoovered and cleaned the floor for the second time to get rid of dust from the sanding. In hindsight, I probably could have done the sanding first to avoid needing to hoover and clean twice.
With all prep done, I was ready to mix the paint and make a start. I simply followed the instructions that came with the paint; which was to pour in the 10ml Additif that comes the paint and stir well for a few minutes. Once you add the Additif, the paint has to be used within 10 days.
The paint point comes with two lids. One of which can be used as a paint tray. I personally did not need to use this.
I started by painting the edges of the room using my paint brush. I then worked my way around the room using the paint foam roller. I repeated this step for each section until all 3 coats of paint where applied.
Throughout the process I wore socks to avoid getting oil or moisture from my feet onto the cleaned floor.
Although this paint dries pretty quickly after application, you have to leave the paint to dry for 3 hours after each coat. Be sure to keep the paint pot properly covered while waiting for each coat to dry.
So you are probably wondering, just how long did this project take to complete. Well… my living room was painted in 4 sections. This was purely due to lack of space. Having my sofa, and cabinets in the lounge while doing this work, made it just a bit more difficult. Each section required 3 coats and each coat needs 3 hours drying time.
Yep!
This project took wayyy to long.
But ….

It was totally worth it. I love the end result. It turned it even better than I had imagined. I still find myself walking past my living room and smiling. That feeling when your hard work pays off is truly priceless.
I wanted to wait before sharing this because I had read on the V33 website that it can take up to 20 days for the paint to fully dry.
……….
….
2 months later, I think the paint has fully dried and there are Still no regrets.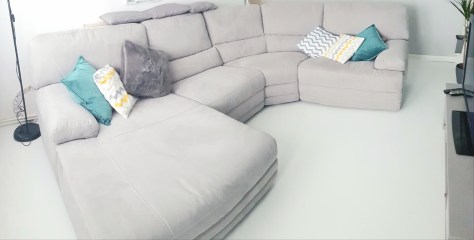
I am definitely more mindful about getting stains or scratches on the floor. By default I am also cleaning the living room more often because every crumb and dust is so much more visible on white flooring. I have also noticed that certain types of footwear leave prints on the floor so we generally do not wear shoes in the house anymore.
So my final words
This has been a great way to revamp the living room flooring and it cost less than £150. I think I have stopped the time on the re-flooring project by about 2-3 year.
I know that as times goes by, the once perfectly white floor will begin to show signs of being trampled on day in day out. I have braced myself to embrace that beauty too.
The floor has become significantly more slippery. This might be because the paint has a satin finish. To help with this we have bought rugs to reduce slip and also add warmth to the lounge. Absolutely no clinical feel or look over here.
I hope this post answers any questions you might have regarding this project. If I have missed any details please feel free to ask in the comments box below.
I have also posted a YouTube video that you might find to have more visual details here.
Watch this space, I may well do an updated review after 6-12months.
See you soon, in the meantime stay in touch by connecting with me @ijaykheavens.
x


![PSX_20170325_165441[1]](https://allthingstallandplus.com/wp-content/uploads/2017/03/psx_20170325_1654411.jpg?w=474)
![PSX_20170325_165321[1]](https://allthingstallandplus.com/wp-content/uploads/2017/03/psx_20170325_1653211-e1490463032675.jpg?w=679)
